The Precision of the Aperture: Dimension, Tolerance, and Structural Harmony
Common window sizing mistakes in the architectural assembly, the window is often perceived as a static aesthetic element—a transparent boundary designed for light and ventilation. However, from the perspective of building science and structural engineering, a window is a high-precision mechanical insert that must coexist with the relative imprecision of a rough structural opening. The act of sizing a window is not a mere measurement task; it is an exercise in managing tolerances, thermal expansion, and hydrostatic pressure. Instead, it manifests as a slow erosion of the building envelope’s integrity, leading to chronic air infiltration, mechanical binding, and premature sealant fatigue.
The complexity of modern fenestration requires a departure from the “measure-twice, cut-once” adage. We are navigating an era of multi-layered insulated glass units (IGUs), thermally broken aluminum extrusions, and fiber-cement composites—all of which possess different coefficients of expansion. To understand sizing is to understand the invisible gap between the architectural intent and the physical reality of the framing.
Furthermore, the industry is currently grappling with a divergence between standardized manufacturing and bespoke residential design. While mass-market “stock” windows adhere to rigid incremental sizing, custom architectural projects often demand dimensions that push the limits of sash weight and hardware capacity. Navigating this landscape requires a granular technical framework that accounts for the “Rough Opening” (RO), the “United Inches” (UI), and the “Net Frame” dimensions. This analysis seeks to deconstruct the pervasive errors that occur at these intersections, providing a definitive roadmap for those seeking to achieve a perfect, resilient fit in any fenestration project.
Understanding “common window sizing mistakes”
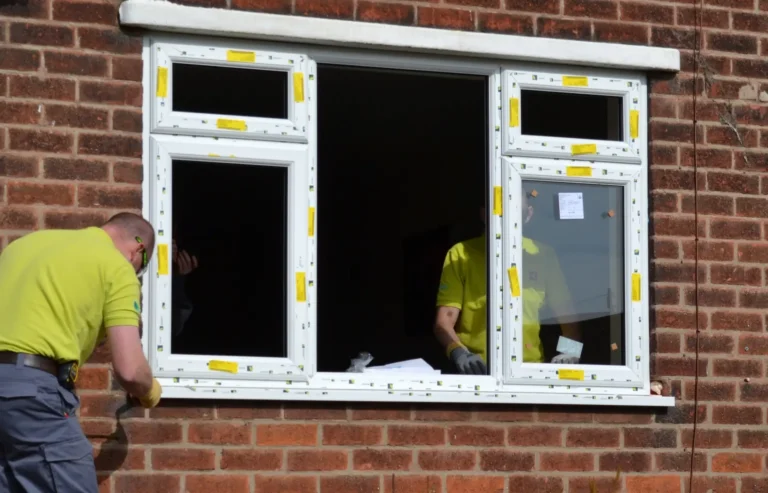
To effectively analyze common window sizing mistakes, one must distinguish between “Measurement Error” and “Conceptual Error.” Measurement errors are the result of simple human fallibility—misreading a tape measure or failing to check for “out-of-square” conditions. Conceptual errors, however, are far more insidious. These occur when an installer or specifier fails to account for the thickness of the “Flashing Tape,” the expansion gap required for the specific frame material, or the “Dead Load” deflection of the header above the window. A primary misunderstanding is that the window frame should be as close to the rough opening size as possible to “improve insulation.” In reality, an overly tight window prevents the application of a robust perimeter seal and leaves no room for the structural settling that occurs in every home.
Oversimplification risks are particularly high in the context of “Replacement” vs. “New Construction” sizing. In a replacement scenario, measuring the “daylight opening” (the visible glass area) and adding a fixed increment is a recipe for disaster. This approach fails to account for the depth of the existing “blind stop” or the slope of the “sill.” Identifying these nuances requires a forensic eye—measuring the opening at the top, middle, and bottom, as well as checking the diagonals for “Rack.”
Furthermore, the “United Inches” (UI) calculation—a common pricing metric—often obscures the mechanical limits of the window. A window that is 10 inches wide and 90 inches tall has the same UI as a window that is 50 inches wide and 50 inches tall, but the mechanical stresses on the hardware and the glass deflection risks are fundamentally different. A common error is sizing a window based on aesthetic proportions without consulting the manufacturer’s “Performance Grade” (PG) charts. When the glass is too thin for the size of the opening, “Oil Canning” or wind-induced vibration can lead to catastrophic glass failure.
Deep Contextual Background: The Evolution of Fenestration Tolerance
Common window sizing mistakes the history of window sizing is a transition from “Field-Fit” to “Factory-Precision.” The sizing “mistake” of that era was typically making the window too tight, leading to sashes that would swell and stick in the humid summer months. The solution was the “Weight and Pulley” system, which provided enough clearance for movement while using heavy curtains to mitigate the resulting drafts.
The mid-20th century introduction of aluminum and vinyl windows shifted the burden from the joiner to the factory. This era introduced the “Standard Size”—a set of dimensions (e.g., 2030, 3050) that supposedly fit most openings. However, as residential construction moved toward high-production “tract” housing, the quality of the rough openings declined. Contractors were framing faster and less accurately, while window manufacturers were producing units with tighter and tighter tolerances. This “Tolerance Conflict” is the origin of many modern sizing failures.
Today, we are in the era of “High-Performance Envelopes.” We use “Liquid-Applied Flashing” and “Triple-Pane IGUs” that can weigh hundreds of pounds. The contemporary sizing challenge is no longer just about making the window fit; it is about ensuring the window can support its own weight without bowing the frame. As we push for larger “Window Walls” and “Minimalist Profiles,” the margin for error has shrunk to nearly zero.
Conceptual Frameworks and Mental Models Common Window Sizing Mistakes
To evaluate dimensional risks with editorial rigor, apply these frameworks:
1. The “Float and Seal” Framework
This model treats the window as a ship in a dry dock. The window must “float” in the center of the rough opening, supported by “Setting Blocks” and “Shims,” but never touching the structural framing directly. Sizing mistakes occur when the “Shim Space” is less than 1/4 inch or greater than 1/2 inch, compromising the ability of the foam or caulk to maintain a thermal seal.
2. The “Diagonal Rack” Calculus
This framework posits that a rectangular opening is never perfectly rectangular. By measuring the diagonals, one calculates the “Rack” (the degree to which the opening is a parallelogram).
3. The “Substrate Expansion” Mental Model
Different materials have different “Thermal Growth” rates. A 10-foot dark-bronze aluminum window will expand significantly more than a white fiberglass window of the same size.
Key Categories of Sizing Logic and Variations
Window sizing is dictated by the “Installation Type” and the “Substrate Material.”
| Installation Type | Sizing Methodology | Primary Risk | Tolerance Target |
| New Construction | Rough Opening (RO) minus 1/2″ | Inaccurate framing / Out-of-plumb | 1/4″ shim space all around |
| Pocket Replacement | Existing Jamb-to-Jamb minus 1/4″ | Unit too wide for old tracks | 1/8″ clearance |
| Full-Frame Replace | Masonry-to-Masonry minus 1/2″ | Damaging exterior facade | 1/4″ to 3/8″ gap |
| Mullion Combo | Total RO minus 3/4″ | Cumulative width creep | 3/8″ structural shim |
| Storefront/Metal | Net Frame size (Zero RO) | Spanning deflection | 1/16″ precision |
Decision Logic: The “Mullion Creep” Factor
When “Mulling” windows together (joining multiple units), a frequent error is failing to account for the width of the “Mullion Reinforcement.” Failing to adjust the rough opening for this “Creep” results in a window unit that physically cannot fit into the hole designed for it.
Detailed Real-World Scenarios Common Window Sizing Mistakes
Scenario A: The “Settling Header” Crush
A large, 8-foot-wide picture window is installed in a new custom home.
-
The Error: The window was sized so tightly that there was only a 1/8-inch gap at the top.
-
The Result: As the house was completed and the roof was loaded with shingles and snow, the header above the window deflected by 1/4 inch.
-
The Failure: The structural load of the house was transferred onto the window frame, crushing the “Secondary Seal” of the IGU and causing the glass to shatter.
-
The Prevention: Sizing for a minimum 1/2-inch “Head Gap” and using a “Header Deflection Track.”
Scenario B: The “Pocket Replacement” Binding
An owner orders “Pocket” replacement windows for an 1890s Victorian with “Weighted Sashes.”
-
The Error: Measuring the width between the “Inside Stops” rather than the “Jambs.”
-
The Result: The replacement units were 1/2 inch too wide and hit the old pulley housings.
-
The Failure: The installer “forced” the units in, which bowed the vinyl frames, causing the new sashes to be nearly impossible to open.
Scenario C: The “Masonry-Opening” Gap
A contractor measures a brick-to-brick opening for a new aluminum window.
-
The Error: Failing to check if the brick opening is “Tapered” (wider at the back than the front).
-
The Result: The window fit through the interior opening but was too wide for the exterior brick face.
-
The Fix: Always measure the narrowest point of a masonry opening and size the unit 1/2 inch smaller than that minimum.
Planning, Cost, and Resource Dynamics
Sizing errors are among the most expensive mistakes in construction because custom windows are typically “Non-Returnable.”
Range-Based Cost of Dimensional Failure
| Failure Level | Remedy | Cost Multiplier | Timeline Impact |
| Oversized (Too Large) | Re-framing the house opening | 2.5x original labor | 3–5 Days |
| Undersized (Too Small) | Custom “Expander” trim / Filling | 1.2x original labor | 1–2 Days (Aesthetic loss) |
| United Inch Error | Total Unit Replacement | 2.0x original material | 4–8 Weeks (Lead time) |
| Hardware Mismatch | Custom balance/operator swap | 1.3x material | 2 Weeks |
The “Opportunity Cost” of a sizing mistake is the loss of the “Dry-In” date. If the windows don’t fit, the interior trades (drywall, flooring) cannot begin, potentially delaying a project by months.
Tools, Strategies, and Support Systems Common Window Sizing Mistakes
Accurate sizing requires a technical arsenal that transcends the standard 25-foot tape measure.
-
Laser Distometer: Essential for measuring large spans where tape measures “sag,” which can cause a 1/4-inch error over 10 feet.
-
Box Level and Plumb Bob: To determine if the opening is “Leaning.” A window must be plumb even if the wall is not.
-
Digital Protractor: For “Arched” or “Gable” windows where the angle of the “Spring-Line” is critical.
-
Caliper: For measuring the “Jamb Depth” of existing windows in replacement scenarios.
-
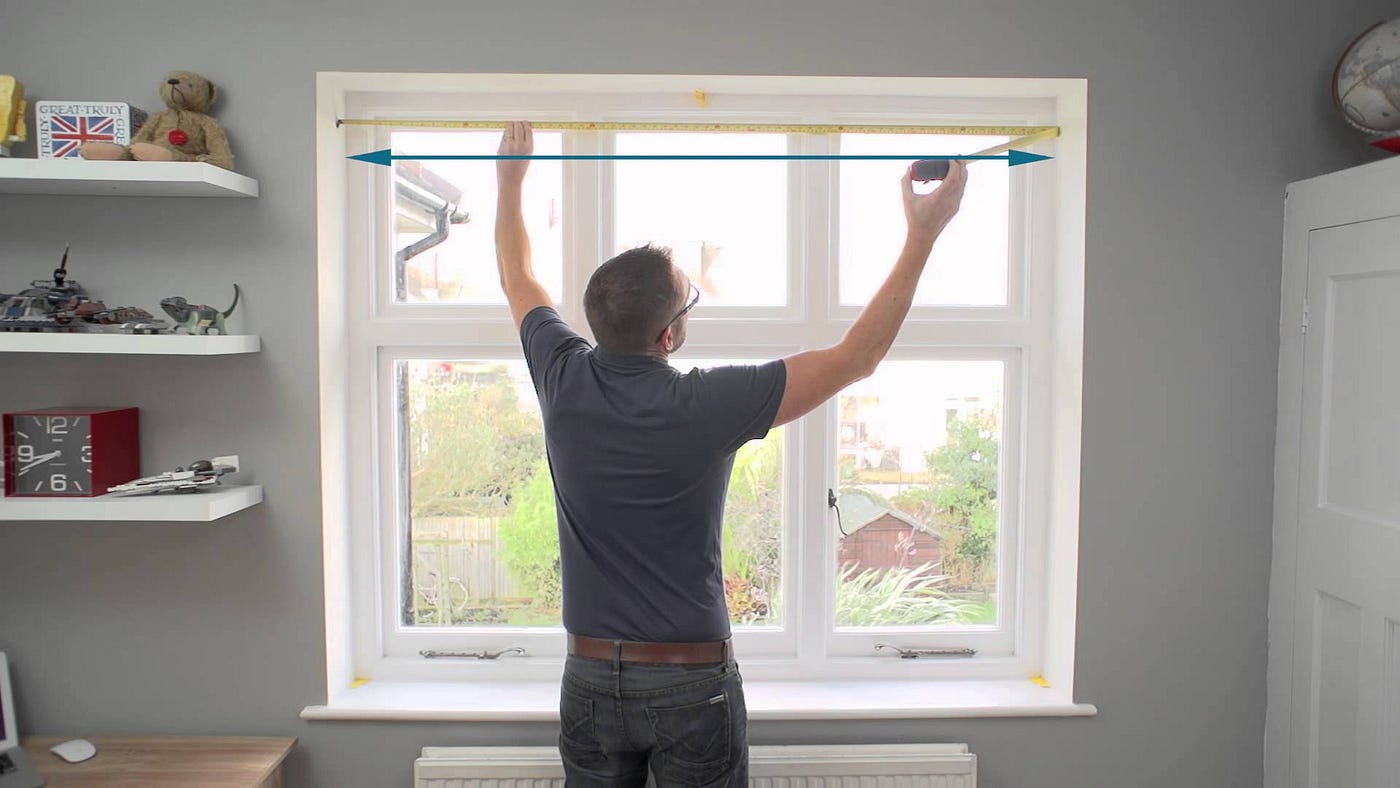
The “3-Point” Measurement Rule: Always measure Width (Top, Middle, Bottom) and Height (Left, Center, Right). Record only the smallest dimension.
-
Shop Drawings: The “Contractual Shield.” Never order a custom window without a signed shop drawing that explicitly lists the “Net Frame” size.
-
Sill Angle Gauge: For replacements, ensures the “Slope” of the new unit matches the old masonry or timber sill.
Risk Taxonomy: Compounding Failures of Poor Sizing
A sizing error is a “Root Failure” that triggers a cascade of secondary issues:
-
Thermal Risk: Large gaps are difficult to insulate properly. Even if foamed, the “Thermal Bridge” created by the extra trim lowers the overall R-value of the opening.
-
Operational Risk: If a window is “Pinch-Sized,” the sash will not be square. This puts uneven pressure on the “Operators” and “Hinges,” leading to mechanical failure within 36 months.
-
Legal Risk: In many jurisdictions, “Egress” windows for bedrooms must meet specific “Net Clear Opening” sizes. Sizing a window based on the rough opening without checking the “Egress Math” can lead to a failed building inspection and the legal inability to occupy a room.
Governance, Maintenance, and Long-Term Adaptation Common Window Sizing Mistakes
Effective sizing is maintained through “Installation Governance.”
The Measurement Verification Checklist
-
Pre-Order: Verify the “United Inches” against the manufacturer’s “Maximum Size” charts for wind-load.
-
Delivery: Before removing the old window, measure the new unit against the existing opening. This “Dry-Fit” check prevents having an open hole in the house for a window that doesn’t fit.
-
Installation: Check that the “Shim Gap” is uniform. If one side has 1/2 inch and the other has zero, the window is “racked” and the sizing is effectively wasted.
-
Post-Installation: Verify the “Reveal” (the space between the sash and the frame). It should be perfectly consistent all the way around. If the reveal is “tapered,” the window is not square.
Common Misconceptions and Oversimplifications
-
Myth: “The rough opening is the window size.” Reality: The window must always be smaller than the opening. The “Net Frame” is the only dimension that matters to the manufacturer.
-
Myth: “You can just cut the siding to make a window fit.” Reality: Cutting siding often destroys the “Water-Management” layer (flashing) of the home, leading to rot.
-
Myth: “Standard sizes are cheaper.” Reality: In custom construction, the labor cost of modifying a rough opening to fit a “standard” window often exceeds the cost of just ordering a custom-sized unit.
-
Myth: “Measure the glass to get the window size.” Reality: Glass size is independent of frame size. Different manufacturers have different “Frame Profiles” (thick vs. thin).
-
Myth: “Vinyl windows can be trimmed.” Reality: Unlike wood, vinyl extrusions are hollow and structural. Shaving a vinyl frame voids the warranty and destroys the unit’s strength.
-
Myth: “If it’s level, it’s correct.” Reality: A window can be perfectly level but “Out of Plane” (twisted), which causes the locks to fail.
Ethical, Practical, and Contextual Considerations Common Window Sizing Mistakes
In the pursuit of “Architectural Perfection,” there is an ethical tension between “Aesthetic Intent” and “Structural Reality.” Designers often want the “Thinnest Frame” with the “Largest Glass,” pushing the window to its physical limits. The “Sizing Professional” has a responsibility to act as a “Technical Gatekeeper,” refusing to size a window beyond its “Performance Grade” capability. Sizing a window too large for its hardware is not just a mistake; it is a safety hazard. Practically, this means favoring “Mullioned Units” (smaller windows joined together) over “Single Giant Lites” when wind loads or sash weights exceed safety margins.
Conclusion: The Wisdom of the Gap
Mastering the dimensions of the aperture is a subtle art. It is the recognition that the “Perfect Fit” is not a tight fit, but a “Floating Fit.” To avoid common window sizing mistakes, one must embrace the reality of construction—that buildings are crooked, materials expand, and headers deflect. The “Shim Space” is not wasted space; it is the “Mechanical Buffer” that allows the window to survive for fifty years. By shifting our focus from the glass to the “Geometry of the Interface,” we ensure that our windows remain silent, functional, and durable guardians of the building envelope.